
Linked Data Forms Overview #
A Linked Data Form is a Form Element that is embedded in another Form. For example, a System Form can include Linked Data Forms for an Application, Permit, Site Evaluation, Septic Tank, Drain Field, Soil Boring and Building.
A Restaurant can include Linked Data Forms for an Application, Inspection and Fees.
The number of Linked Data Forms available for each Map Layer varies depending on the Map Layer. A System Form will have the most Linked Data Forms available to use because it acts as the management unit for the Onsite System, which can include several mapped features, like the Septic Tank, Drain Field and Soil Borings, but it can also include table records, like Applications, Permits, Site Evaluations and O&M Events.
Using Linked Data Forms #
Start by selecting the Create Form button.
In the new window, Name the new Form Example Form 2, for the Layer select System, and for this Form use a Template by selecting System Template.
The System Template Form is a System Form that was created to store basic information about a System Point. It is a good Form to use as a Template to create other System Forms, and here, you will use it to create a new System Form (Example Form 2).
When the new System Form opens, change the Title to Example System Form and enter a Subtitle.
Save the Form.
Scroll down to the last Row in the Form (Comments) and add another Row that contains a Divider. The Divider can be added under Form Fields.
In the Form Elements, go to Linked Data Forms and add a Septic Tank Linked Data Form to the System Form under the Row with the Blank spacer.
Using the Form drop down menu located under the text Septic Tanks, select Example Form from the drop down menu. This will set the Linked Data Form Septic Tanks to the Example Form.
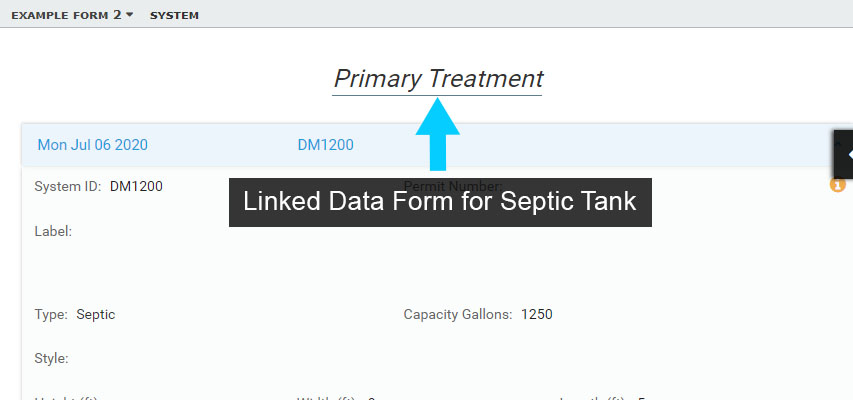
Next, move the cursor over the Septic Tanks text on the Form. Change the text to Primary Treatment or another version of Septic Tanks – just note that you can modify this header text.
Save the Form.

Linked Form Options #
When adding a Linked Data Form you also have two options available to control what Form is displayed as described below:
Modify Name of Form: modifying the Linked Form Title will change what the user sees when entering/viewing information. This option is useful for standardizing names to provide consistency with local conventions.
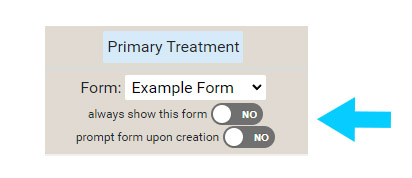
Always show this Form: when toggled on will always show the selected Form (Example Form here) when the Form is used to enter/view information.
Prompt Form upon creation: when toggled on will provide a pick list of all Forms available for the Linked Data Form (Septic Tanks here). This option is useful when multiple Forms have been created to capture, or present, different information for a feature or table record.
For example, there may be several Forms for different Permits, Drainfields, Fees or Inspections. When the Prompt Form upon creation is toggled on, the user would see a pick list of all Permit Forms and select the one that fits the situation.
Use the New Form on the Map #
Make sure the Form has been saved and close the Form Designer.
On the map locate a System point, or map a new one.
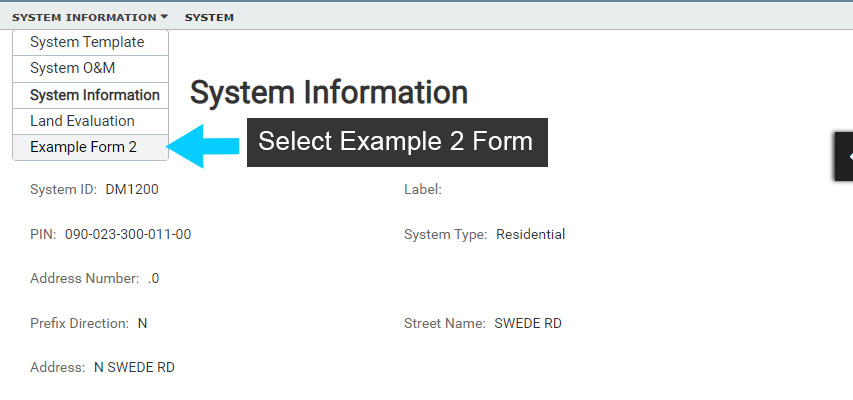
Select the System point, then select ‘Show Form’. This will open the System Form, but the Default Form is likely a System Form other than the Example Form 2 you created.
In the Form drop down menu select Example Form 2. Then scroll down to see that the Example Form you created for Septic Tanks is also displayed.
Note that if a Septic Tank has not been created under the System point, no information will be displayed in the Septic Tank portion of the Form. If this is the case, select the Edit button and add a Septic Tank.
To clean up the Forms created in this example, open the Forms Designer and either Rename the Forms for continued use, or Delete them.
To Delete a Form, the Form that is to be Deleted must be the active or open Form in Form Designer.