Map Settings
May 2nd 2023
Map Settings are used to manage a number of options available in FetchEH, such as managing the Fee Schedule, Text Library, Food Observations and Corrections, Food Repeat/Recurring Counts and setting up Default Forms. This section will review Map Settings options and provide examples of how to use each option in both the Sewage/Well Permitting and Food FetchEH.
Default Forms
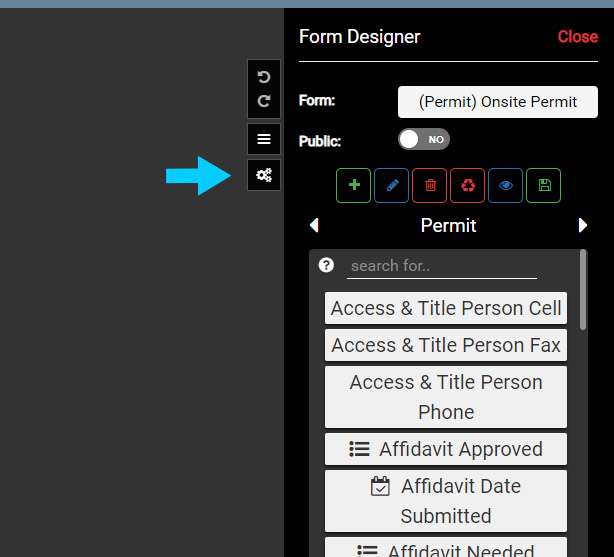
Map Settings are managed under the Form Designer menu, so to access Map Settings select the Form Designer button on the Main Menu.

Use the Side Pane menu in Form Designer to select the Map Settings button. This will open the Map Settings menu.
Use the Side Pane menu in Form Designer to select the Map Settings button. This will open the Map Settings menu.
Next, select the Default Forms text to open the Default Forms options.
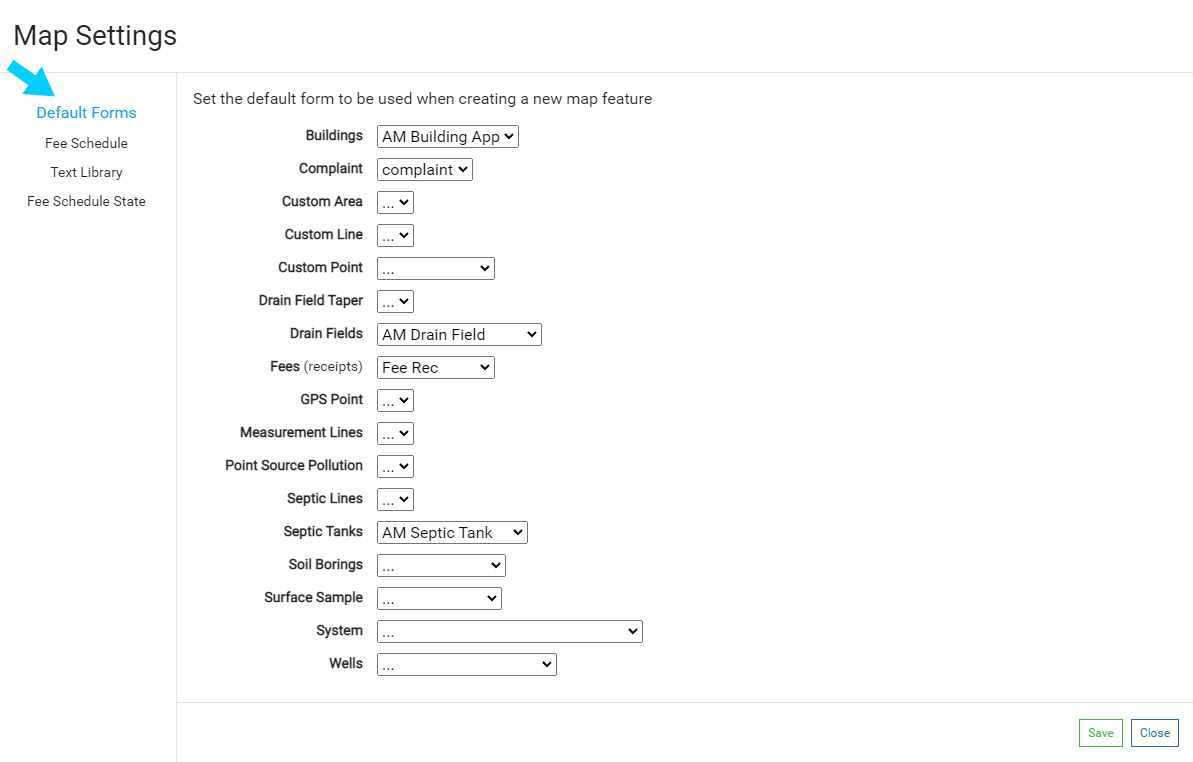
Default Forms can be set for both the Sewage/Well Permitting and Food FetchEH. Default Forms, when defined, set the Default Form that will appear when creating a new map feature, such as a Restaurant, Body Art, System, Septic Tank, Drainfield and more.
Setting Default Forms for new Restaurants, Systems or Wells can help standardize what Form is presented when a feature is first created. This is especially true if there are multiple Forms used for Restaurants (Application, Food Inspection) or Systems (Application, Permit, Site Evaluation).
Setting Default Forms
To set a Default Form for a map feature, use the pick list menu to select the Default Form. The selected Form will now automatically be displayed when the corresponding new map feature is created.
In the example below, the Buildings Default Form is set to 'AM Building App', which means when any new building is mapped this Form will be displayed for entering data.
Use the Save button to save any changes made to the Default Forms.

Fee Schedule
The Fee Schedule is available in the Sewage/Well Permitting and Food FetchEH.
The Fee Schedule is used to add, modify or remove Fees. Fees are assigned to map layers (System, Well, Restaurant, Pool) and tables (Application, Inspection, Permit, Contractor). Uncategorized Fees can be added to any map layer or table.
Once Fees are added to the Fee Schedule, they can be added to map layers or tables to track Fees. For example, a new System is mapped and an Application is added for a new Sewage Permit and Site Evaluation, which both have an associated Fee in the Fee Schedule.
The Fees for the new Sewage Permit and Site Evaluation can now be added to the Application.
Managing Fee Schedule
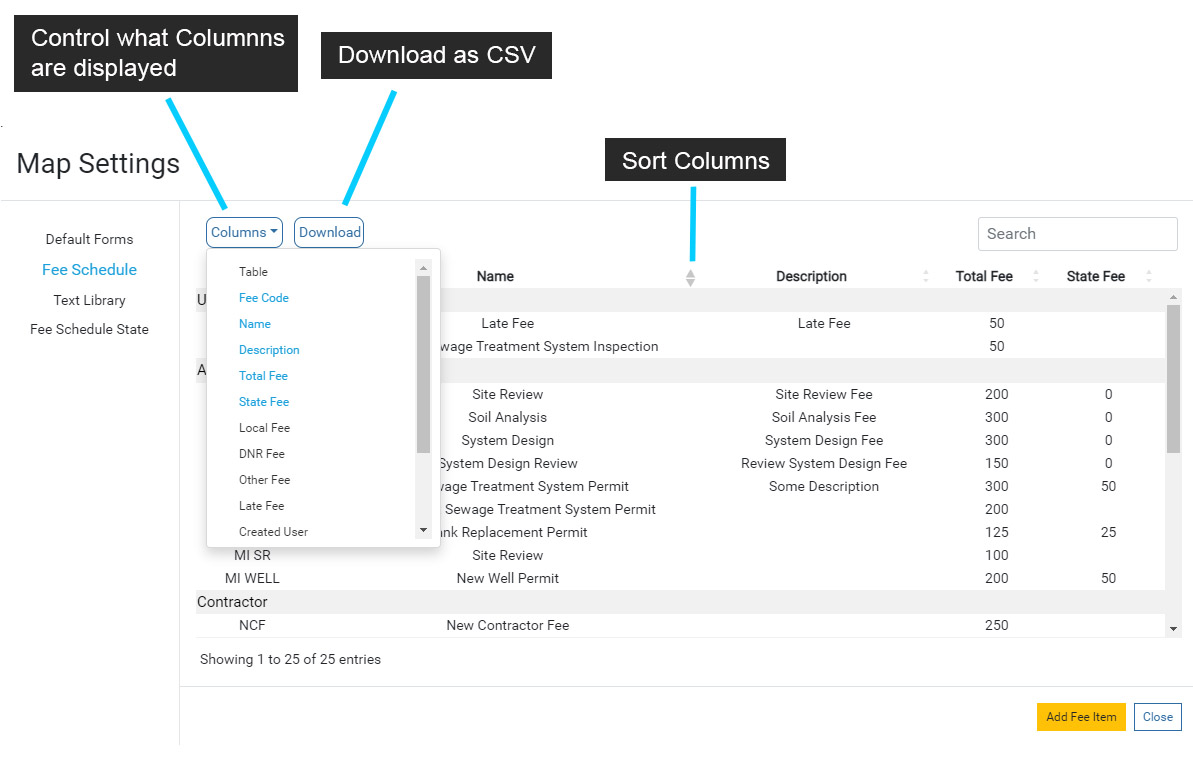
Fees in the Fee Schedule are organized by their corresponding map layer or table.
Use the Columns menu to modify what columns are displayed in the Fee Schedule. Note that each column can also be sorted.
Use the Download option to download a CSV of the Fee Schedule. It is recommended that you download a copy of the Fee Schedule before you make annual changes to Fees.
Adding or Modifying a Fee
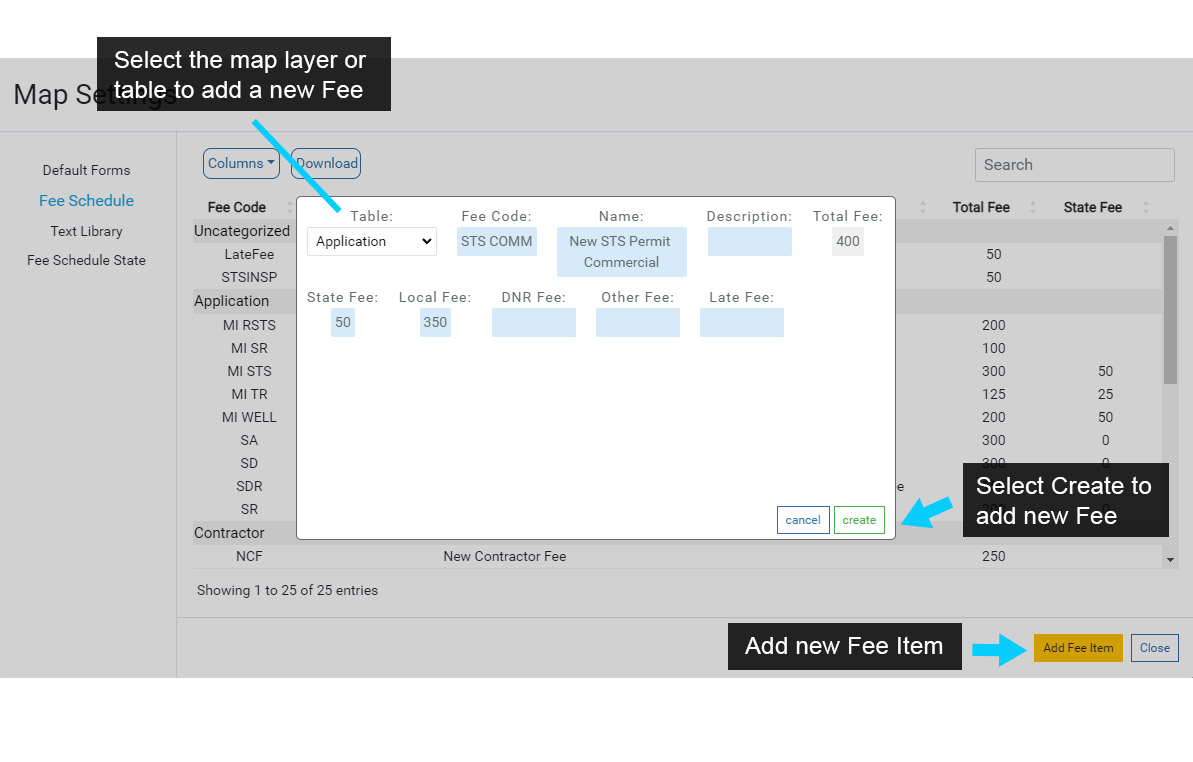
Select the Add Fee Item button to add a new Fee to the Fee Schedule.
Use the Fee Item window to select the Fee Table, then fill in any fields that will be used for the Fee.
Select Create to save the new Fee to the Fee Schedule.
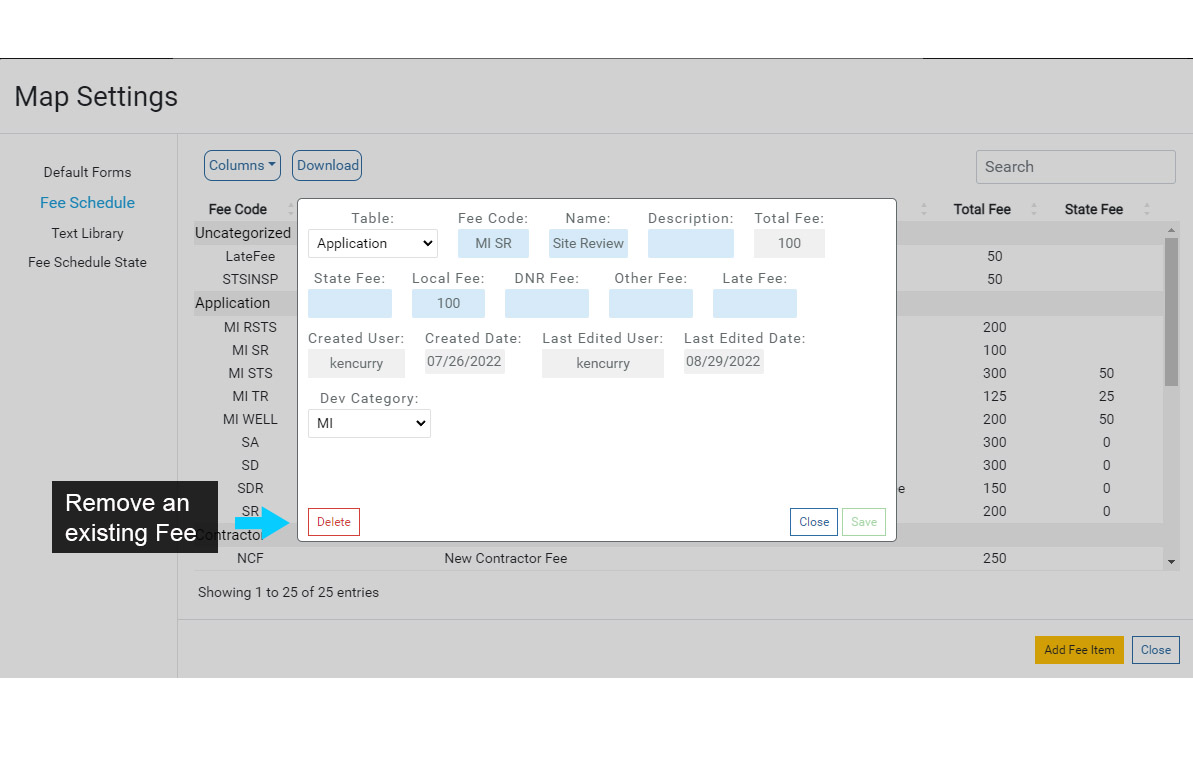
To modify or remove an existing Fee, select the Fee in the Fee Schedule to open the Fee Item window.
Next, modify any fields or select Delete to remove the Fee from the Fee Schedule. Note that removing a Fee is permanent.
Saved Responses (Food)
Saved Responses are used to add standard Observations and Corrections for Violations. Saved Responses are only available for Food.
Saved Responses are displayed when a Violation is added to an Inspection and the user selects the Observation or Correction field. After selecting the Observation or Correction field, any Saved Responses are displayed as a pick list, and when selected are added to the corresponding Observation or Correction field.
Note that if there are no Saved Responses that correspond to the Violation that has been added to an Inspection, the pick list will be empty. Users also have the option to not use the pick list and enter their own text.
Managing Saved Responses
Adding, modifying or deleting Saved Responses initiates by selecting a corresponding Violation.
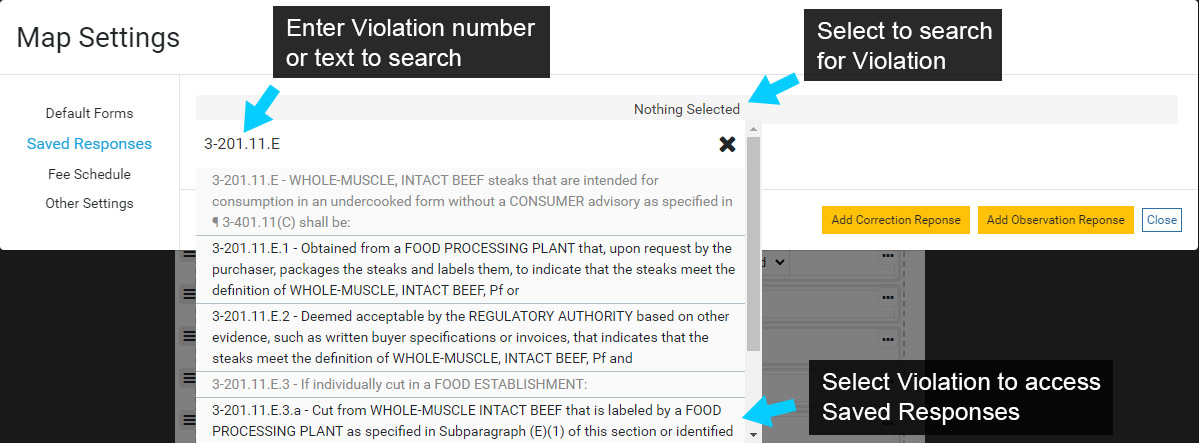
Select the gray header (Nothing Selected) to search for a Violation. Find a Violation by scrolling the list or searching for a specific Violation.
Search terms can include text or the Violation number. Note that a partial Violation number can be entered, but the format below should be used:
Complete Format: 3-201.11.E.3.a
Partial Search: 3-201.11
Select the Violation that you would like to add, modify or delete Saved Observations from.
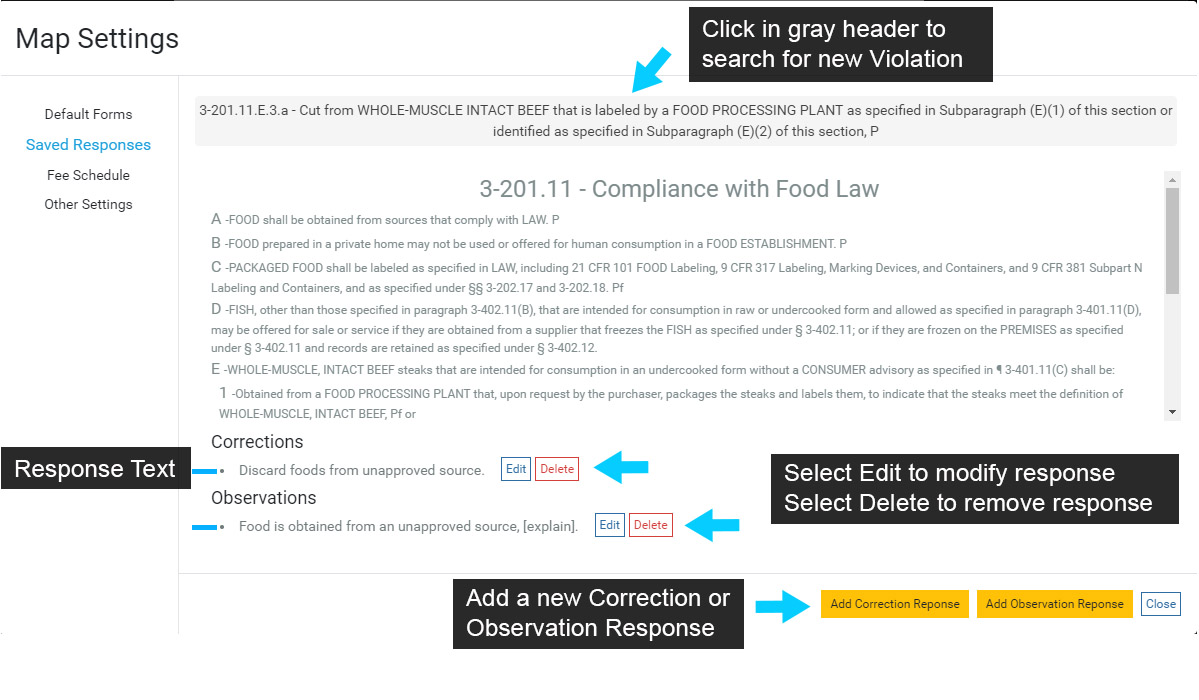
The current Violation is displayed in the header and in the area beneath the header. To search for a new Violation, select the header again.
Note that Save Responses are organized by the Violation section. In the example below the Saved Responses will be available for all 3-201.11 Violations, including all sub-sections (3-201.11.A, 3-201.11.B and so on).
Existing Correction and Observation responses can be modified by selecting Edit, or removed by selecting Delete.
Adding a new Saved Response can be accomplished by selecting the corresponding Add Correction Response or Add Observation Response.
Save any edits to existing or new Responses.
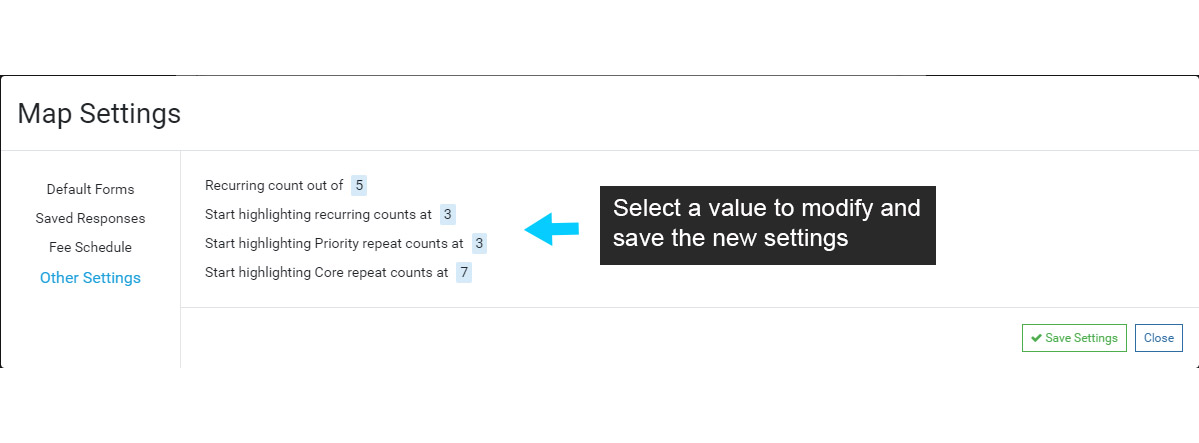
Other Settings (Food)
The Other Settings option is available in Food and are used to set Recurring or Repeat Counts.
To modify a County number, select it and enter a new value. The 'highlighting' numbers will highlight the corresponding Repeat or Recurring number on a Violation when that Violation meets the Repeat or Recurring Count threshold.
For example, a Violation is added to an Inspection. The same Violation was also added at the two previous Inspections, so the Repeat Count = 3, meeting the Count threshold. In this example, the Repeat Count 3 will be highlighted when the Violation is added, drawing attention the the field for enforcement action.
Note that Repeat and Recurring reporting can also be setup to scan for Violations that have met the enforcement threshold, or that are close to meeting the threshold.
Text Library (Sewage/Well Permitting)
The Text Library is used to add standard text to Permits, Drainfields, Septic Tanks and Land/Site Evaluations. Standard text that is in the Text Library can then be used to add Instructions, Site Preparation, Isolations and Remarks when creating a Permit, Drainfield, Septic Tank or Land/Site Evaluation.
Text that is added to the Permit, Drainfield, Septic Tank or Land/Site Evaluation persists as data, so it will always be retained in the database similar to other data. Text can also be edited when it is added to a Form, so creating placeholders (size, depth, type, etc.) for features are easy to integrate.
Additional Content: Update Video Text Library
Managing the Text Library
Adding, removing or modifying Text Items that have been added to the Text Library starts by selecting a Table (Permit, Land Evaluation, Drainfield, Septic Tank).
Select the gray header ((Permit) Septic Instructions) to view the Tables and Fields that are available in the Text Library.
Note that for Permit, you can organize Text Items for Septic and Well Permits, so Septic Instructions would be added to a Septic Permit, while Well Instructions would be added to a Well Permit.
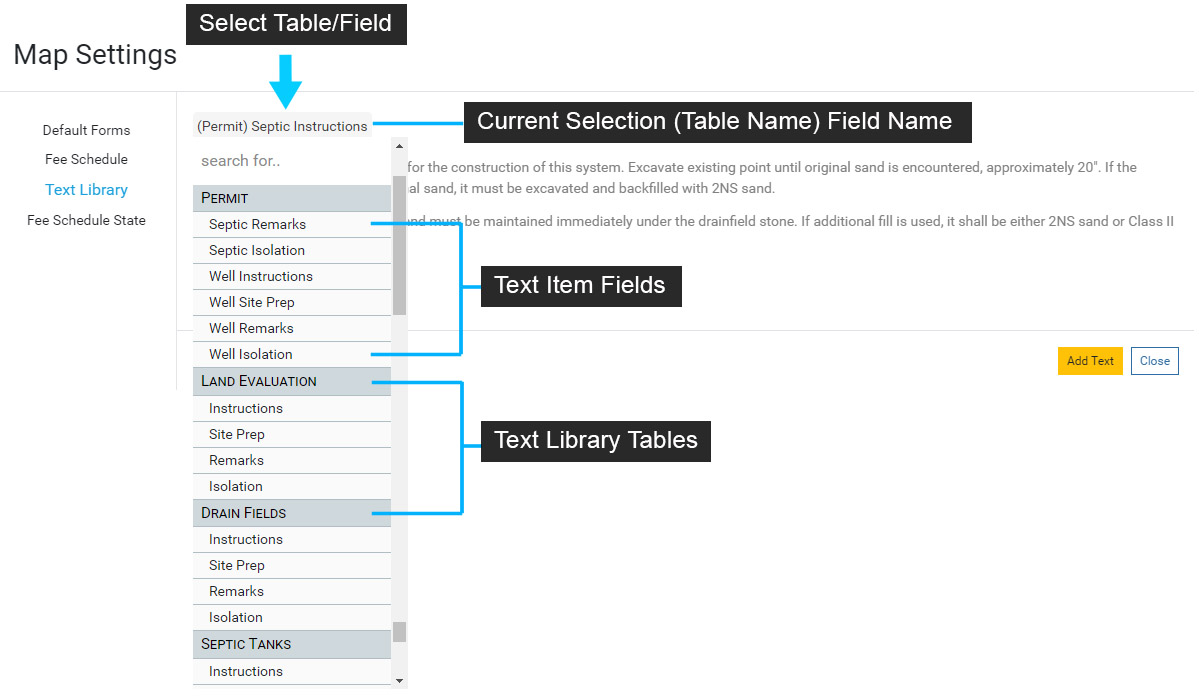
Select a Table and Field to add a new Text Item to the Text Library. In the example below the Permit table and Septic Instructions field are selected.
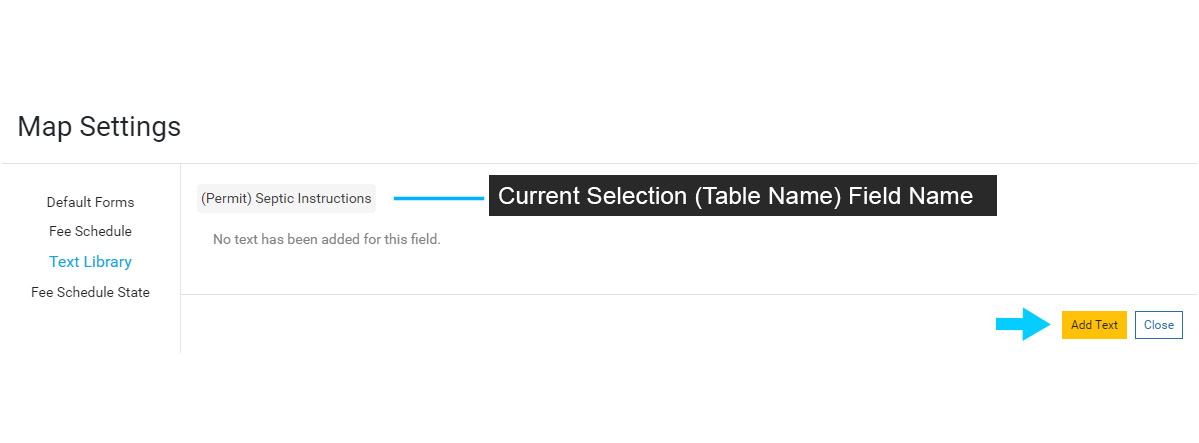
Initially, there will be no Text Items displayed as none have been added. Select 'Add Text' to add a new Text Item.
Use the menu to enter a new Text Item for the Permit Septic Instructions. The bullet will appear when the Text Item is added to a Permit, so if you do not want to use bullets, remove them before entering a Text Item.
You can also copy text in a document and paste into the Text field. When using this method, right click next to the bullet to open the context menu and select 'Paste as plain text'.
Select 'Create' to add the new Text Item to the Text Library.

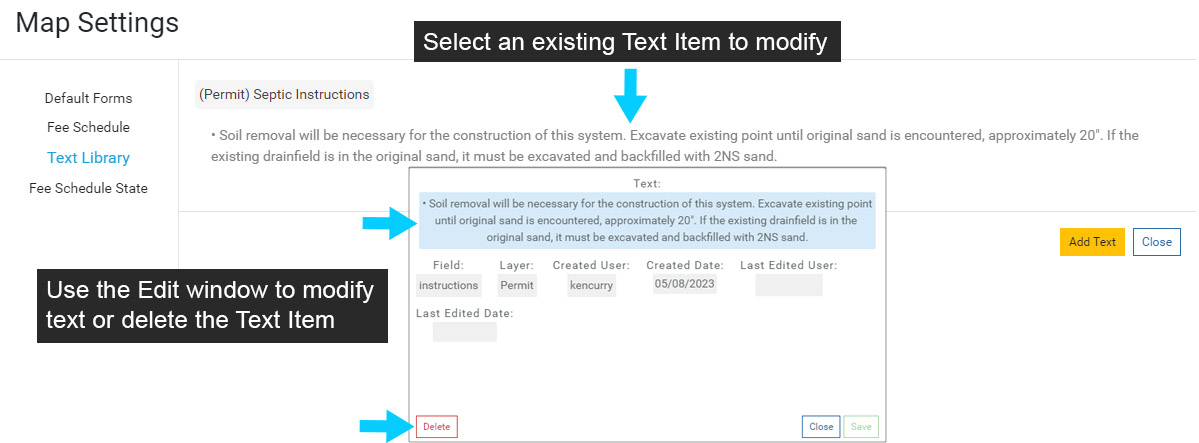
The new Text Item will now be displayed under the (Permit) Septic Instructions.
Select the Text Item to modify or delete it. Save any edits and close the Edit window when finished.
Add Text Item Fields to Forms
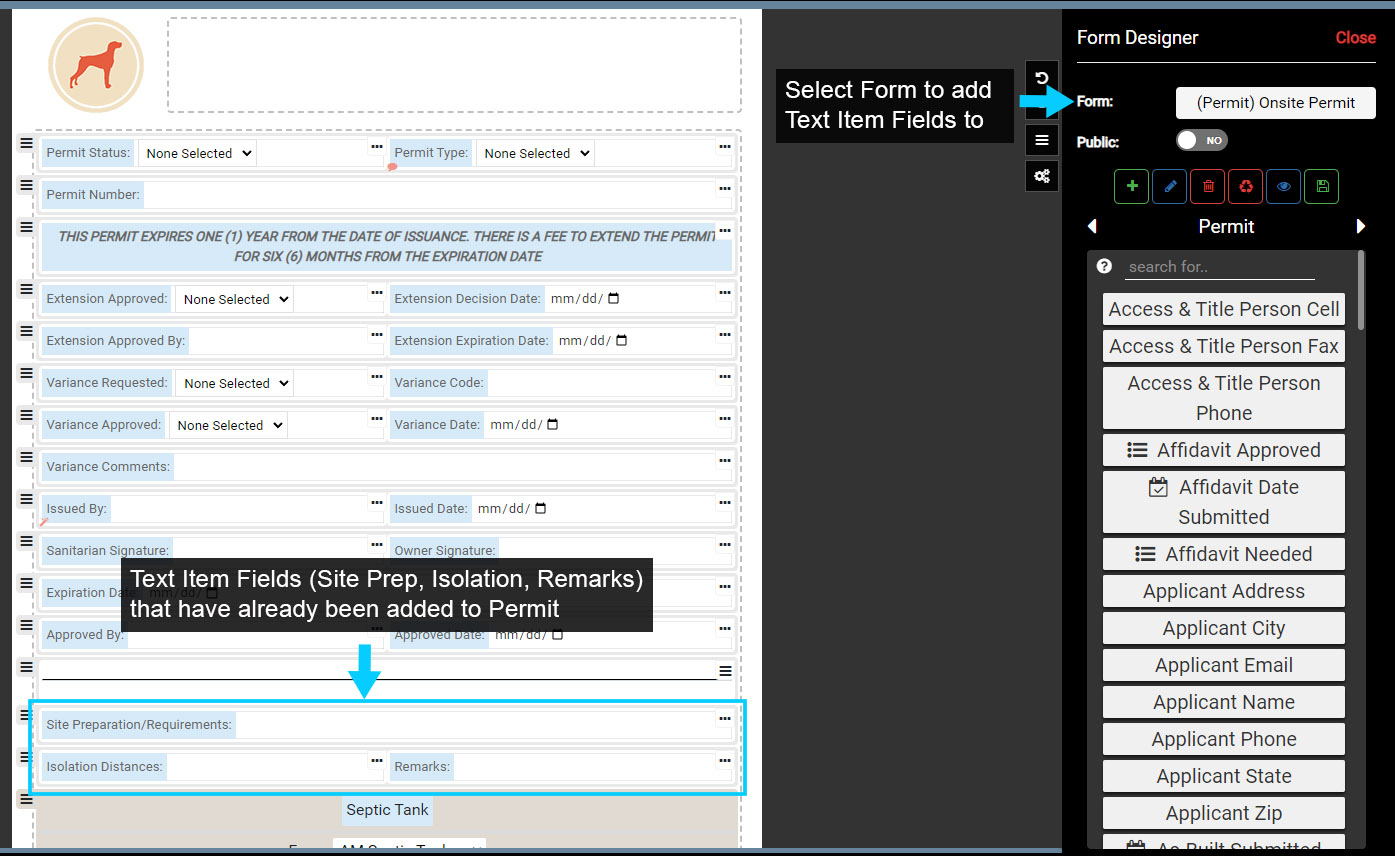
In order to use the Text Library and corresponding Text Items, the corresponding Text Item Fields need to be added to the table's Form (Permit, Land Evaluation, Drainfield, Septic Tank).
In Form Designer, select a Permit Form. In the image below the Onsite Permit Form has been selected and three of the four Text Items Fields (Site Prep, Isolation and Remarks) have already been added to the Permit.
Note that you can alias the Text Item Field names, so "Site Prep" in the image is now "Site Preparation/Requirements".
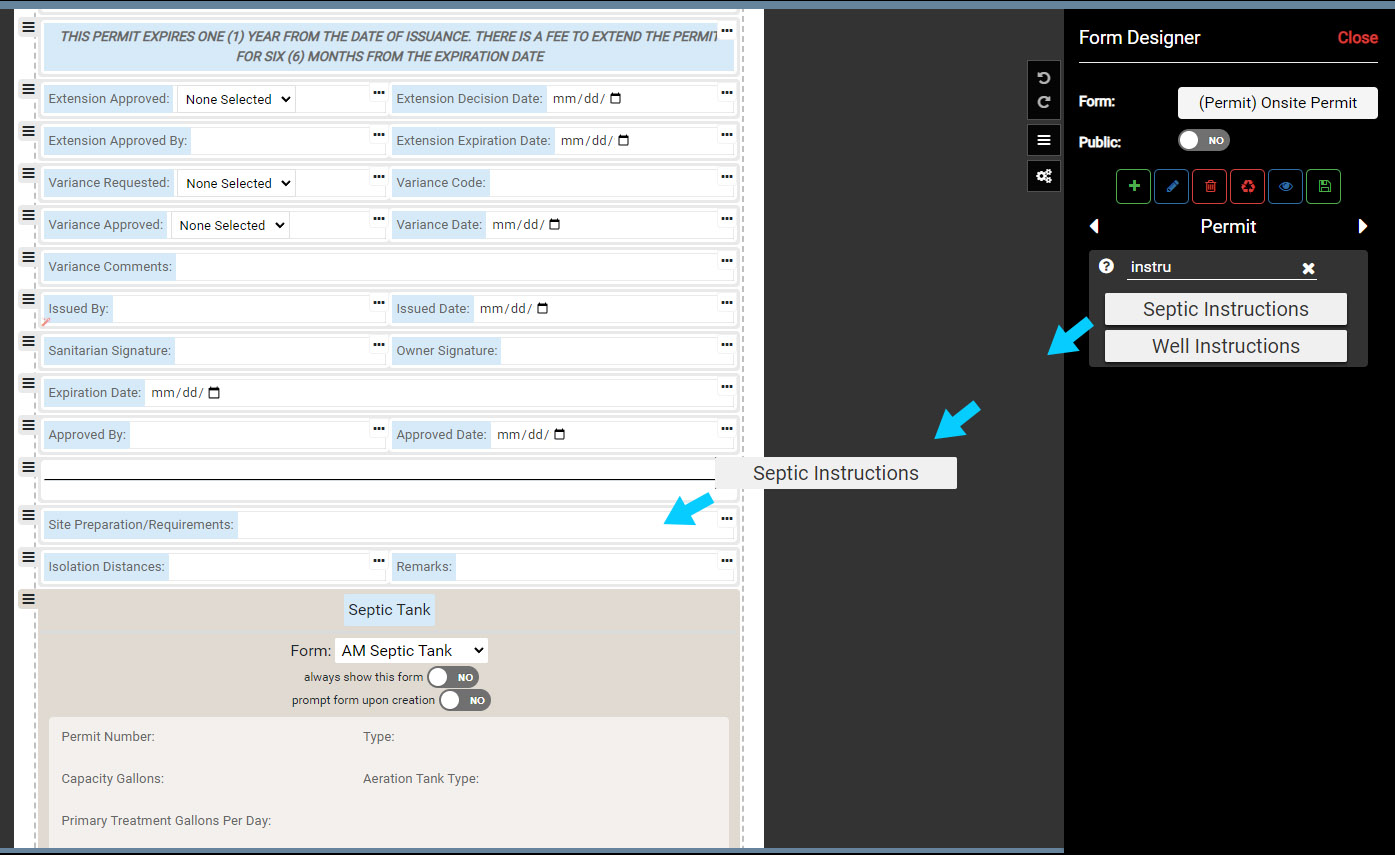
Locate the Instructions Field by scrolling the list of available Fields or typing "Instruction" in the search.
Because there can be a Septic or Well Permit, there are two Instruction Fields available.
Click and drag the Septic Instruction onto the Permit Form and Save the edits. The Text Item Field can now be used to add Instructions to a Permit.
Adding Text Items on Front End (Permit)
Once Text Items are added to the Text Library and the corresponding Text Item Fields have been added to the appropriate Forms, users can add Text Items to live Permits, Land Evaluations, Drainfields and Septic Tanks.
Select a System that has a Permit or other table (Land Evaluation, Drainfield, Septic Tank) with Text Item Fields added.
In the example below the System > Onsite Permit Form is selected.
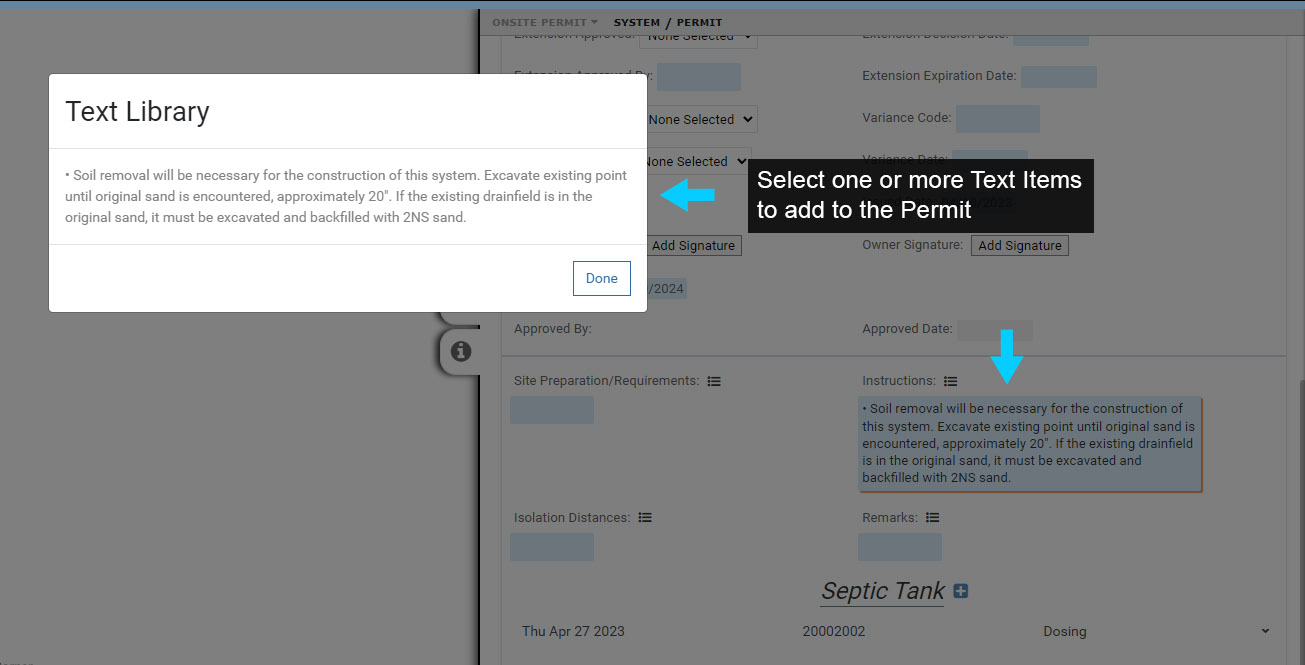
Use the "Import from text library" button to add Text Items to the Instructions.
Select one or more Text Items to add and note that the Text Items are added to the corresponding Field (Instructions in the image below). You can also add the same Text Item again and use for an additional text block if needed.
Select 'Done' to finish.
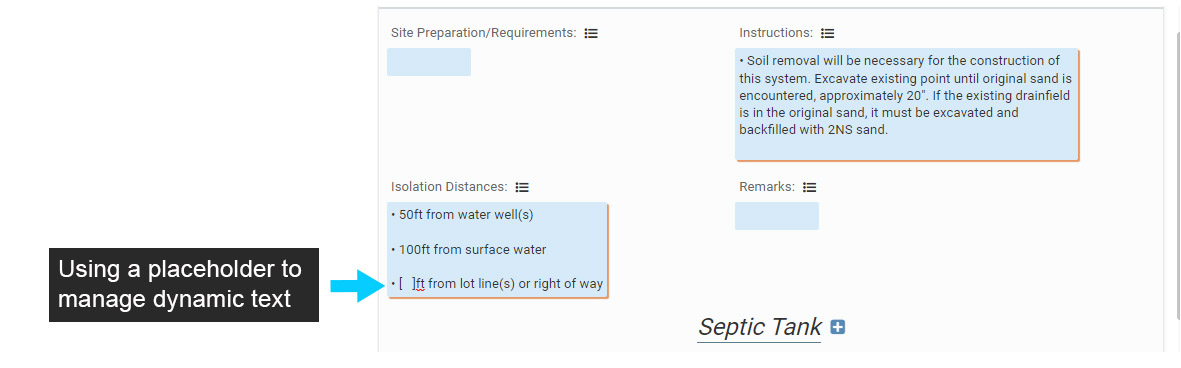
You can also create Text Items that act as placeholders for dynamic information, such as Isolation distances, depths and more.
In the example below a placeholder Text Item is used for different Isolation distances to lot lines or right of ways.